这篇文章主要讲解了“怎么实现Oracle集群自启动”,文中的讲解内容简单清晰,易于学习与理解,下面请大家跟着小编的思路慢慢深入,一起来研究和学习“怎么实现Or...
这篇文章主要讲解了“怎么实现Oracle集群自启动”,文中的讲解内容简单清晰,易于学习与理解,下面请大家跟着小编的思路慢慢深入,一起来研究和学习“怎么实现Oracle集群自启动”吧!
我们先看如下部分:
Oracle 10G:
cat /etc/inittab
h2:35:respawn:/etc/init.d/init.evmd run >/dev/null 2>&1 </dev/null
h3:35:respawn:/etc/init.d/init.cssd fatal >/dev/null 2>&1 </dev/null
h4:35:respawn:/etc/init.d/init.crsd run >/dev/null 2>&1 </dev/null
Oracle 11G:
cat /etc/inittab
h2:35:respawn:/etc/init.d/init.ohasd run >/dev/null 2>&1 </dev/null
在Oracle10g版本中,系统启动时由init进程根据/etc/inittab配置文件来派生出集群的高可用守护进程,在Oracle 11g中,init仅派生出init.ohasd,然后由init.ohasd启动ohasd.bin实现集群的自启动。
另外,由于RedHat Linux 6.x弃用了inittab文件,目前配置init.ohasd进程的文件由/etc/inittab变为/etc/init/oracle-ohasd.conf。
[root@rac1 init]# cat /etc/rc.d/init.d/oracle-ohasd.conf
 # Copyright (c) 2001, 2011, Oracle and/or its affiliates. All rights reserved.
 #
 # Oracle OHASD startup
 start on runlevel [35]
 stop  on runlevel [!35]
 respawn
 exec /etc/init.d/init.ohasd run >/dev/null 2>&1 </dev/null
 [root@rac1 ]#
在Red Hat 7.*以上版本中,init.ohasd脚本配置又一次发生变化,init.ohasd以service形式配置在/etc/systemd/system下。
Red Hat Linux 7.*
#cat /etc/systemd/system/oracle-ohasd.service
# Copyright (c) 2016, Oracle and/or its affiliates. All rights reserved.
#
# Oracle OHASD startup
[Unit]
Description=Oracle High Availability Services
After=syslog.target network-online.target remote-fs.target
[Service]
ExecStart=/etc/init.d/init.ohasd run >/dev/null 2>&1 </dev/null
ExecStop=/etc/init.d/init.ohasd stop >/dev/null 2>&1 </dev/null
TimeoutStopSec=60min
Type=simple
Restart=always
# Do not kill any processes except init.ohasd after ExecStop, unless the
# stop command times out.
KillMode=process
SendSIGKILL=yes
[Install]
WantedBy=multi-user.target graphical.target
大部分资料在介绍集群自启动时,均是按照以上方式来介绍的,但这种描述方式并不准确,实际上Oracle集群自启动是由init.ohasd和ohasd两个脚本相互配合来完成集群的自启动,这两个脚本均位于/etc/rc.d/init.d目录下。
如下:
Red Hat Linux 7.*
#cat /etc/systemd/system/oracle-ohasd.service
# Copyright (c) 2016, Oracle and/or its affiliates. All rights reserved.
#
# Oracle OHASD startup
[root@rac1 init.d]# pwd
/etc/rc.d/init.d
[root@rac1 init.d]# ls -ltr *ohasd*
-rwxr-xr-x. 1 root root 6835 Aug 29 09:57 ohasd
-rwxr-xr-x. 1 root root 9076 Aug 29 10:40 init.ohasd
[root@rac1 init.d]#
init.ohasd
通过对init.ohasd脚本的分析,该脚本主要有两个作用,第一个作用为创建名为npohasd的命名管道文件,并在init.ohasd运行过程中始终read该命名管道文件,以此作为标记,该作用为init.ohasd最重要的作用,因为当命名管道文件未被read标记时集群无法启动),第二个作用,init.ohasd作为ohasd.bin的高可用守护进程而存在,当ohasd.bin进程异常终止时,由init.ohasd再次启动ohasd.bin,来实现ohasd.bin进程的高可用,而ohasd.bin进程是集群的高可用进程,当集群资源意外终止时由ohasd.bin所属的agent进程负责重新启动相应资源,同时ohasd.bin也是负责整个集群启动的进程。(集群并非由init.ohasd脚本启动,init.ohasd做集群启动时的前期准备工作)
ohasd
ohasd脚本是在系统启动时,真正启动集群的脚本,集群安装完毕后,ohasd脚本被软连接到/etc/rc.d下面的相关启动级别目录中(/etc/rc.d/rc[0-6].d/*),系统启动时,执行不同级别的脚本程序,启动级别为3时/etc/rc.d/rc3.d/S96ohasd被执行,此时ohasd脚本调用$ORACLE_HOME/bin/crsctl脚本来启动集群。
ohasd脚本在执行时会判断/var/tmp/.oracle目录是否存在,如果/var/tmp/.oracle不存在,将会创建/var/tmp/.oracle目录,并将.oracle目录权限置为01777 ,/var/tmp/.oracle目录中存放着集群启动及正常运行时所产生的套接字以及命名管道文件。
如下为/etc/rc.d/rc[0-6]/*中ohasd脚本的软连接情况:
[root@rac1 ~]# ls -ltr /etc/rc.d/rc[0-6].d/*ohasd*
lrwxrwxrwx. 1 root root 17 Feb 21  2018 /etc/rc.d/rc5.d/S96ohasd -> /etc/init.d/ohasd
lrwxrwxrwx. 1 root root 17 Feb 21  2018 /etc/rc.d/rc6.d/K15ohasd -> /etc/init.d/ohasd
lrwxrwxrwx. 1 root root 17 Feb 21  2018 /etc/rc.d/rc4.d/K15ohasd -> /etc/init.d/ohasd
lrwxrwxrwx. 1 root root 17 Feb 21  2018 /etc/rc.d/rc2.d/K15ohasd -> /etc/init.d/ohasd
lrwxrwxrwx. 1 root root 17 Feb 21  2018 /etc/rc.d/rc1.d/K15ohasd -> /etc/init.d/ohasd
lrwxrwxrwx. 1 root root 17 Feb 21  2018 /etc/rc.d/rc0.d/K15ohasd -> /etc/init.d/ohasd
lrwxrwxrwx. 1 root root 17 Mar 26 01:40 /etc/rc.d/rc3.d/S96ohasd -> /etc/init.d/ohasd
[root@rac1 ~]#
init.ohasd/ohasd何时被调用

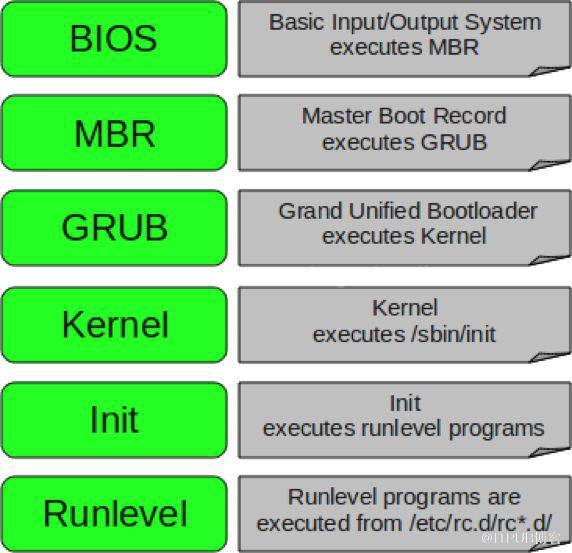
1)开机BIOS自检,且根据BIOS中配置的启动设备读取MBR并加载Bootloader程序。
2)加载并执行引导程序GRUB。
3)GRUB根据配置加载内核映像。
4)内核启动(根文件系统挂载,内核执行/sbin/init)。
5)Init依据/etc/inittab中配置运行级别进行系统的初始化(初始化脚本: /etc/rc.d/rc.sysinit)。/etc/init/*内配置文件生效是在该步进行
6)根据不同的运行级别,启动相应服务 (服务程序脚本位于/etc/rc.d/rc[0-6].d中)。
Linux系统在启动时大概可以分为6步,init.ohasd和ohash是在第5步和第6步来被调用启动集群。
当系统启动到第5步的时候,init进程会扫描/etc/init/下面的所有配置文件,关于Oracle集群,init进程会根据/etc/init/oracle-ohasd.conf中的内容派生init.ohasd进程(由init.ohasd发出read命名管道文件npohasd的命令)。
系统启动到第6步时,根据系统的不同启动级别,/etc/rc.d/rc[0-6].d/*中的脚本程序被执行,此时ohasd调用$ORACLE_HOME/bin/crsctl脚本,由crsctl负责集群的启动。
| 禁用集群自启动
ohasdstr
在/etc/oracle/scls_scr/[SID]/root/目录中有一个配置文件ohasdstr,当ohasd脚本被调用时会读取ohasdstr文件,根据ohasdstr文件中记录的enable/disable来判断集群是否随系统启动而自启动。
如何避免集群随系统启动而自启动?正确的做法是通过"crsctl disable/enable crs"的方式来控制集群是否随系统启动而自启动,"crsctl disable/enable crs"实际上就是修改配置文件ohasdstr。
如下:
#cat /etc/oracle/scls_scr/qdata1/root/ohasdstr
enable
[root@qdata1 /root]
#crsctl disable crs
CRS-4621: Oracle High Availability Services autostart is disabled.
[root@qdata1 /root]
#cat /etc/oracle/scls_scr/qdata1/root/ohasdstr
disable
[root@qdata1 /root]
#crsctl enable crs
CRS-4622: Oracle High Availability Services autostart is enabled.
[root@qdata1 /root]
#cat /etc/oracle/scls_scr/qdata1/root/ohasdstr
enable
[root@qdata1 /root]
#
当然,我们也可以直接手工修改ohasdstr文件。
另外,也有些资料在介绍禁止集群自启动时,采用注释掉oracle-ohasd.conf中派生init.ohasd部分,此时系统启动时init进程无法派生init.ohash脚本,但这种方式为取巧方式,直接将init.ohasd的运行进行禁止,这种方式并不建议,如果init.ohasd脚本未启动,npohasd命名管道文件不会被创建,并且不会被read,当需要使用’crsctl start crs’手工启动集群时,由于命名管道为被read,此时集群无法启动,这种情况下我们可以手工执行"exec /etc/init.d/init.ohasd run",然后再使用’crsctl start crs’命令来启动集群。
顺便说一下,在/etc/oracle/scls_scr/[SID]/root/目录中还有一个ohasdrun配置文件,该文件是控制init.ohasd是否实现ohasd.bin高可用的配置文件,上面我们说过init.ohasd脚本其中一个作用是实现ohasd.bin进程的高可用,init.ohasd就是通过ohasdrun这个配置文件来判断当ohasd.bin进程异常终止时,是否启动ohasd.bin进程。
init.ohasd/ohasd丢失后如何处理
init.ohasd/ohasd两个脚本是在集群安装配置时执行root.sh过程中,由$GRID_HOME/crs/init/目录中复制而来,当脚本init.ohasd/ohasd丢失后可以从$GRID_HOME/crs/init中重新复制,并将/etc/init.d中的init.ohasd/ohasd权限置为755即可。
感谢各位的阅读,以上就是“怎么实现Oracle集群自启动”的内容了,经过本文的学习后,相信大家对怎么实现Oracle集群自启动这一问题有了更深刻的体会,具体使用情况还需要大家实践验证。这里是捷杰建站,小编将为大家推送更多相关知识点的文章,欢迎关注!